PhotobucketPhotobucketPhotobucketPhotobucket

Wednesday, May 1, 2013

Let's Make A Deal

I became owner of this dresser in the most unlikely way.  An older friend called me to come over and give her a quote on fixing several of her piece's of furniture.  I only mention "older friend" because you need to know she has had a long time to collect all kinds of beautiful furniture and other things.  I knew she loved all her furniture and probably wouldn't ever part with any.


First I looked at a disassembled table that I knew I couldn't and wouldn't want to  repair.   Then I looked at a beautiful old wooden office chair with an arm rest that was broken right where it curves, not an easy fix at all.  She then showed me this dresser.  It's finish was yellow and peeling and there was a broken drawer, but
really not too bad at all.  I was busy enough doing other furniture, that I either needed this piece to be mine, so I could do it at my leisure or not at all.  So I said to her, "You just need to sell it to me".  Her reply surprised me; "I can do that, so make me an offer".  Crafty, crafty lady, I didn't see that coming, but so happy it did.


Someone had glued the drawer joints together but probably didn't clamp it.  So the wood being old and warped naturally went back to where it had been before a whole bottle of glue was used to repair it.
Luckily the glue was on the inside of the drawer and not the joints so I was able to use a rubber mallet on it and pop it apart.  After I removed the old glue and cleaned up the joints I glued it again but this time had three big clamps on hand that I left on over night.  It's good as new now!


  It had layers of lacquer or yellowed varithan that I needed to get off before I did anything else.  I used Jasco Paint and Epoxy Remover.  I really like this product because it doesn't have a strong odor like so many of them do and it works fast as well.  After the drawers were stripped I decided to tackle the top.  I was going to paint it but decided to see how it would look stained.


 The top turned out beautiful, however the picture doesn't do it justice.  I sealed it with a rub on poly,
                                    about three coats to get a luster that I was happy with.
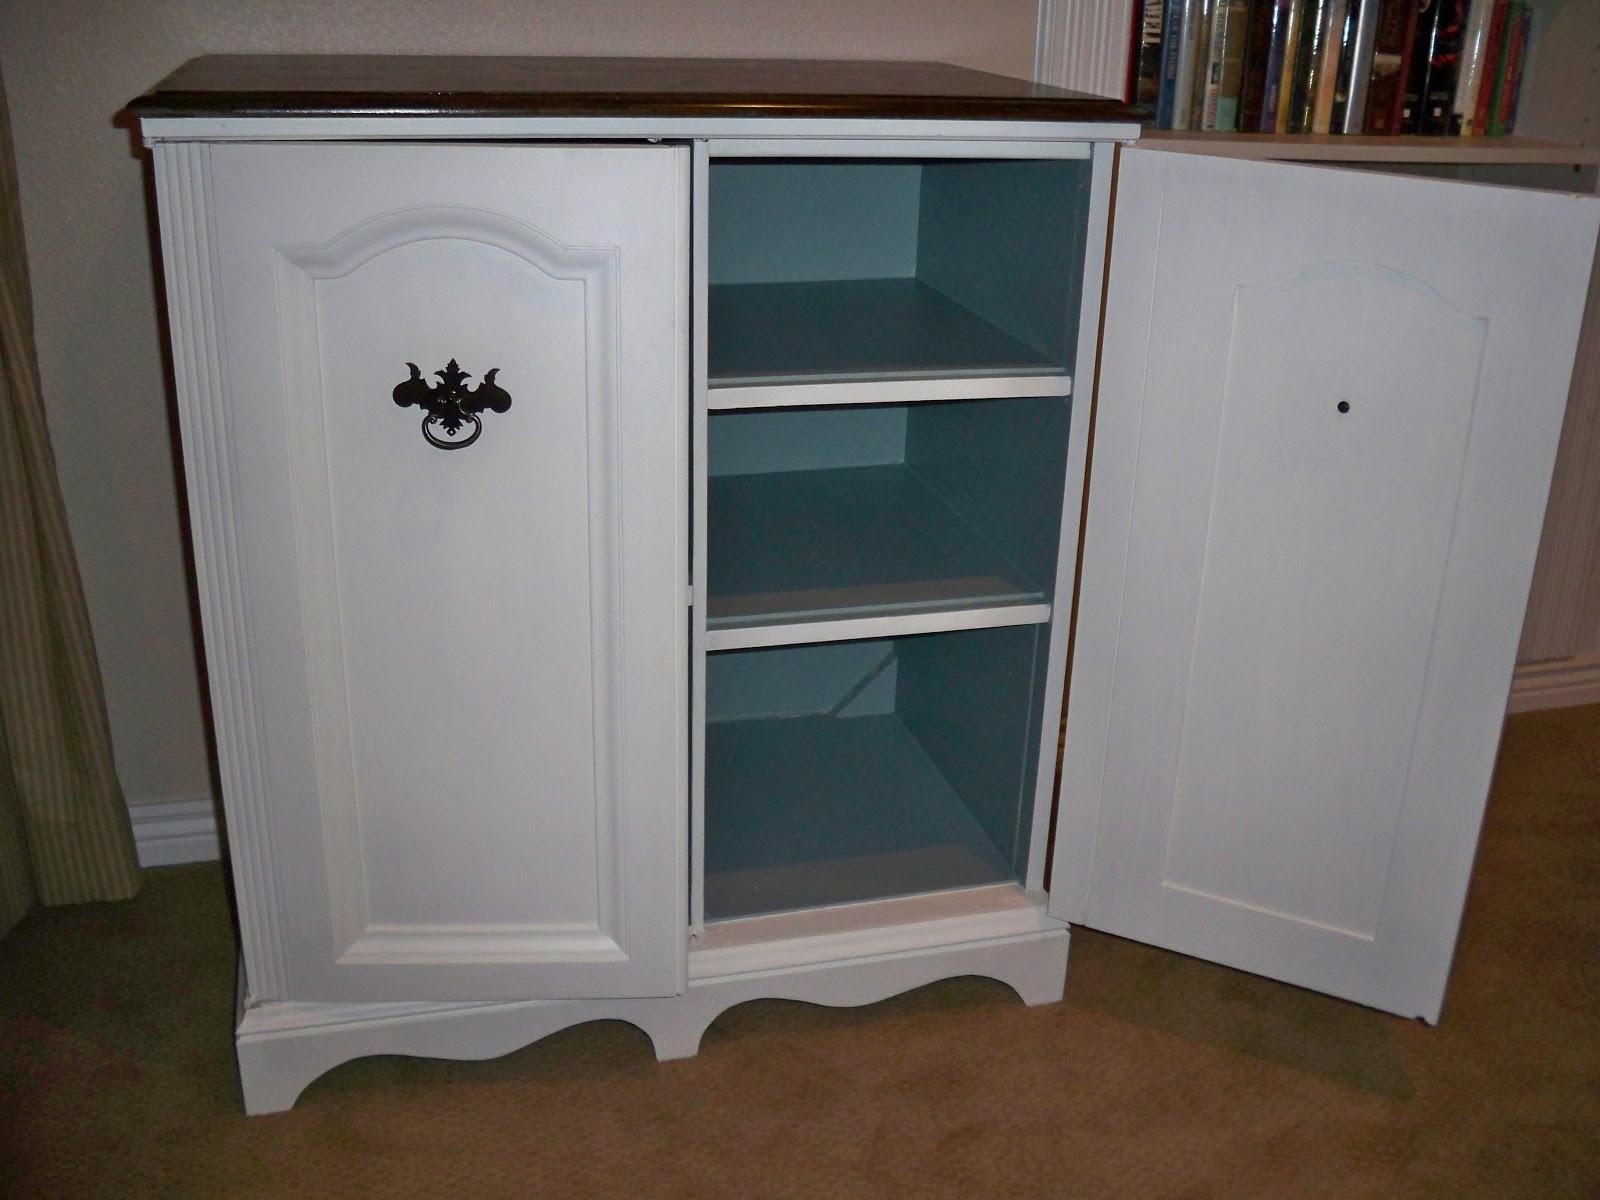
Here's the finished product!  So much better in old white chalk paint and a stained top.


I Really love the finish on the top.


Some of the original hardware was missing on the top two drawers so I went to Hobby Lobby and got these glass knobs.  They have a brown hue to them that went well with the other hardware that I spray painted in Rustoleum's oil rubbed bronze.


My dear friend probably thinks I restained it, oopsy!
Thanks so much for stopping by, I love your comments and
followers as well.


Thursday, March 28, 2013

Two Flights of Stairs but Worth It

I have to tell you this is the heaviest dresser I've bought so far.  Maybe it seemed heavier then usual because the owner lived two flights down from the main level of her apartment complex and wasn't able to help me carry it.  There's no way I could carry it by myself so I went looking for help.  There happened to be a man in the parking lot moving someone else in so I grabbed him.  He was a life saver.


This dresser is also the nicest one I have bought so far.  It didn't need to do any repairs on it like, wood filler, sanding  gluing, clamping, etc. etc. etc.


And the inside was so clean, I mean when I don't find someone's old tooth or disgusting floss, dried up food, or a hair ball that jams my vacuumn,  well then I just feel special.


I did however find this recipe for "Chocolate Supreme" jammed in the back of the dresser.  I thought it might be an old antique, but when I saw the computer print on it I figured it out.


For the dresser I made a homemade chalk paint again. This batch was a little different from the other one I usually make.  I used flat paint instead of latex satin.  I blogged and found a recipe that seemed to be the standard for those using flat paint.  You use:
1 cup flat paint
2 tbsp. plaster paris
small amount of water.
Mix the plaster of paris with the water separately and stir it until it's completely smooth.  Then mix it with the paint.

The handles are original to the dresser so I took them off, scrubbed them with dish soap and a tooth brush.  I later high lighted ithem with Rub and Buff.  That brought the right amount of shine and lustre back to them.
It had some really pretty wood


                                 It had some pretty scrolling on it that you can't see from a distance.


It turned out great and was so nice not to have to get into my carpenter mode to work on this.

Thanks so much for stopping by, I love your comments
and new followers as well.

Wednesday, March 20, 2013

It's As Clear as Black and White

Well this dresser was a fun find.  I got it off of craigslist from a lady who was doing just what I'm doing, fixing up old furniture and selling it.  She had got tired of doing it and was ready to get rid of a couple dressers she had left in the garage.  When I saw this dresser painted all black I knew I wanted it and that I was going to lighten it up a bit, okay, a lot! 


I couldn't tell for sure if the mirror was original to the dresser but I thought it looked great with it so I treated it as if it were original to the dresser.  I stripped the top of the dresser down but the black paint had seeped into the wood grain  so deep that I couldn't remove all of it. I decided to stain it dark ebony so it would blend in with the bits of dark paint. It worked out great.


The original hardware had been removed, and as you can see in the above picture,
it was replaced with some little silver pulls.
I happened to have some hardware that I took off another old
dresser that matched the age of this so much better.
                                       With a little oil rubbed bronze on them they worked prefectly.


I painted it in swiss coffee homemade chalk paint.  I lightly distressed the edges and then sealed it all with rub on Min Wax poly.  I took the mirror out and stained the mirror frame the
same as the top of the dresser. 

The drawers are lined in a black and white floral contact paper.  I wished I could find more pattern's and colors of contact paper.  It is the easiest covering to put in and take out.  Any suggestions?


Thank you so much for stopping by, I love your
commets and new follower's as well.

A Sewing Chest with a "Tude"

One of my favorite clients contacted me to do a few pieces for her, this sewing cabinet is one of them.  I love it because it's so different from the usual stuff that I do.  But what I really love about it is that the client wants to paint it RED.  I paint so many pieces white because that color sells the fastest so  I'm thrilled to be painting something red. 


I really don't know if there is a proper name for this piece so I will just call it a sewing chest.  Caytie told me her Grandmother used to keep her yarn in the two side compartments.  Can't you just see a Grandma sitting in the evening on the sofa with this chest near by  with threads of yarn coming out of it as her needles just a  flying, making the next needed piece of......okay... okay, but it does paint a pretty picture.


Caytie's father did the repair work on it so I started with the sanding and paint work.  It had the normal scratches on it from being old and probably going through some moves as well.  I had to be really careful when sanding the half circle's because the wood was thin.  I looked, but never could find any nails that held the slats together, and yet they definitely were all individual so I guess they were just glued.  I sanded very carefully needless to say.  I primed it with Val spar latex spray on primer, which I really liked.


I used some contact paper to line the drawers with, and they looked so pretty.  The two handles were original but the top pull was new and went with the cabinet so well.


TA....DA....... didn't it turn out pretty?  When I paint my toe nails red my hubby refers to them
as toe's with a attitude.  This cabinet
definitely has a "tude".


Thank You so much for stopping by, I love comments
and new follower's as well.

Wednesday, March 13, 2013

A Long Hard "Pull"


 My great customer Caytie, brought me her hubbies favorite night stand to update for her.  That sounded fun because it's so different from what I have been doing.  So I was excited to get started,
in fact so excited that I didn't take any pictures until this step. 
  To me what dated the night stand the worst were the pulls on it, which you don't see now.
  They were one long piece of wood that looked glued on, and 
as you can tell they are about my least favorite of all pulls out there. 


I took the wood pulls off and filled the holes with Elmer's wood fill.  I let that dry over night then sanded it down really good and you'd never know there had been two holes there.


First I sanded the top so I could  restain it in a darker richer color. Originally it was a lighter stain and gave it a washed out appearance, and  the darker stain gave it a lot more character.  I used dark walnut by Min Wax, one of my favorite colors.  The top is made with different types of wood, kind of like a butcher block., so each piece stained differently.  Some stained a lot darker then other pieces so I  let it all dry and then restained the lighter one's a third or forth time.  It came out looking really good.


I painted the body in ASCP paris gray, then distressed the edges with sand paper.  Caytie chose these very cool and updated pulls to replace the old one's that were on it.  What a great choice, especially
for a guy's night stand. 
 I wanted to keep this somewhat masculine so I chose a brown diamond shaped
  paper to line the  drawers

What a nice transformation!!  He's happy and She's happy.  It really was fun working on this piece, but the truth be known, her hubby was probably just as happy with the old look as the new one. However being the good guy that he is, he just smiled and said, "it looks great"! .


Thank you so much for stopping by, I love your comments and new
follower's as well.


Tuesday, November 13, 2012

A Blast From the Past


I love restoring old things so they don't end up in dumpster somewhere.  But when I found this old radio I thought I hit the jackpot for my hubby.  He loves old radio's and juke boxes, really anything thats old and is associated with music.  I loved the look of the cabinet and was hoping that he would be able to restore the electrical part of this radio/record player.


Wires were hanging out every where and most of them looked like they had been chewed into by... something?  When Doug looked at it he tried several things in hopes of being able to restore it but it was really broken.  There were tubes broken and pieces missing, not to mention the scary wiring again. 


The speaker was completely blown and the record player wasn't any better off.  The poor thing had seen much happier times, I'm sure.  We hated to do it, but we decided to gut it or it would end up in a dumpster somewhere.  At least we could save the cabinet.  Doug did save all of the radio and record player parts, he just couldn't throw out something so cool. 


So the reconstruction started, and what a job it was.  Doug helped me on most of this part, which I was very thankful for.  I could have done it but he is so fast at it, maybe because he is a contractor!


Here I have already sanded and stained the top, which the wood on the top was beautiful.  I sprayed a primer on the rest and am ready to paint, but what color should it be? 

 
It was kind of boxy looking so we decided to take the jig saw to the bottom of it.  Doug gave it a great new style on the bottom.  Notice the picture above and the after picture below.
The inside became a cabinet with a lot of nice shelves.  I then painted it Graycon, one of my favorite colors.  It's kind of a aqua/green, but really pretty.


The outside I finished in Swiss Coffee. The stain color for the top is dark walnut, and then I used about four coats of rub on poly to seal the top and one coat to seal the rest of the piece.


Ta Daaaaa!  I loved being able to at least save the beautiful cabinet.  It would have met up with the dumpster soon in the condition it was in.  The aqua/green is such an inviting color and adds so much charm to this old piece.  Now it has a whole new purpose and will be used for years to come.


Thanks for stopping by, I love your comments and new follower's as well.

Retro Meet Shabby

My daughter spotted this dresser and another one at a yard sale and grabbed them for me.  Both of them are retro style, which isn't my favorite style but I thought I would try something new.  The first dresser I painted took forever to sell so I decided to change the retro look of this one a little bit.  I had the hubby attach some moulding around the top edges to take away the sharp rectangular boxy  look.  I wanted to soften the top up a bit and adding the molding did the trick.


Cleaning the dresser up and sanding it was the first time I really took a good look at it.  The drawers all worked great, and the inside of them were so clean.  I've had a really long run of dressers that the drawers are messed up and many of them are so filthy, so this was a nice change.  The curves on the bottom drawers were so cool, it gave it a really unique look. The handles were pretty neat looking too so I definitely wanted to reuse them.


                               I scuffed up the Formica top and painted it with ASCP in Graphite.


  The body I painted in Swiss coffee and distressed lightly.  Doesn't it look like a completely different dresser?


Thanks so much for stopping by, I love your comments and new followers as well.
Sandi